3 Tips for the best oyster mushroom growing experience
Congratulations on getting your very own Nuvedo High Protein Oyster Mushroom Growing Kit!
We are really happy that you have taken a step towards bringing the magic of mushrooms into your lives. #MoreRoomForShrooms
If you have just received your kit, you probably have a lot of questions on your mind right now. Where do I keep it? How much water do I spray? When do I harvest?
We have tried to answer as many of those questions here in our FAQ Section.
We highly recommend that you through it once before you start.
For those curious to know more, continue to read on:
The substrate block you see inside the kit is nothing but chopped and sterilized straw with mycelium (the white stuff) growing on it. The patches of yellow and brown that you see on the block are metabolites released by the mycelium as it feeds on the straw for its nutrition.
Once you cut open the membrane of the substrate and spray water on the block for the first time, the mycelium gets triggered into the fruiting stage of its lifecycle. The rush of fresh air increased humidity, and exposure to moisture tricks the mycelium to start producing fruiting bodies or what we commonly call mushrooms.
As a mushroom farmer, you have to try and mimic its natural environment in the best way possible for the best results. The mushroom in your growing kit is Lentinus Sajor Caju, commonly known as The Indian Oyster Mushroom.
 It is mostly found growing from the sides of dead tree logs, which is also why you cut the side of the substrate block and not the top.
They grow best in cool (19 – 30 Degrees Celsius) and humid environments (65-80% Relative Humidity) with a lot of fresh air.
For a home grower to improve his chances of getting a beautiful flush, consider 3 things – light, air, and moisture.
 Let’s examine the three factors:
 Let’s examine the three factors:
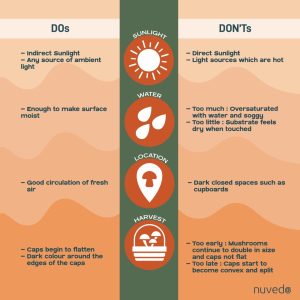
Light:
Mushrooms are not plants, they cannot photosynthesize and depend on the substrate for food. This means that they don’t need direct sunlight but at the same time they cannot survive in complete darkness either. Light is a trigger for the mycelium to produce mushrooms, so you have to place your kit somewhere where it gets exposed to light for around 12 hours a day. The light source can even be ambient indoor lighting, just make sure that it doesn’t get too hot as high temperatures can cause the substrate blocks to overheat and kill the mycelium.
Air:
Mushrooms breathe in oxygen and breathe out carbon dioxide just like us. Oyster mushrooms in particular tend to do well in places that have high levels of oxygen, so keeping your kit in a place with good air circulation is important. Next to a window would be ideal, but if you decide to keep it in a closed room, you should make sure that you open the door to the room and switch on the fan or blower for a few minutes to draw in the fresh air a few times a day.
While fruiting, mushrooms will drop spores, keeping them next to a window will allow the spores to get carried away by air currents.
Moisture:
The membrane on the substrate prevents the block from drying out completely by trapping the moisture inside. Spraying the exposed substrate after cutting the membrane, triggers the mycelium to enter fruiting. This is the same reason that we find mushrooms after fresh rains, the moisture from the rain triggers underground mycelium to reach up to the surface and form mushrooms. So, you aren’t really “watering” the mushrooms like you do plants by spraying water.
This means that you just have to spray enough clean water to keep the substrate moist without making it soggy or wet. A good test to know if your block has enough moisture is to touch the surface of the substrate with your finger (remember to wash your hands before handling the block!), it should feel moist but your finger should not be visibly wet.
Take care to use filtered water as tap water can contain chlorine which is harmful to the growth of mushrooms.
- Humidity: Another aspect of moisture is humidity. If your geographic location has humidity less than 65%, you have to increase the humidity around the kit by placing a wet towel or cloth next to the base of your kit. The evaporation of water from the cloth creates a humid microclimate around the kit, which can help you get good harvests.
We hope we have been able to cover your doubts regarding how you can grow your kit well.
Remember- To be a good mushroom farmer you have to learn directly from the fungi by observing them patiently.
In case you have any more queries please do reach out to us or write to us.
All the best for your mushroom journey!
About the author

Jashid is the co-founder of Nuvedo. An IIM graduate, with a bachelors in manufacturing engineering from BITS Pilani, his interest with fungi and mushrooms started with looking for alternate sources of vegetarian protein. He loves talking about mushrooms, spending time with them and studying their behavior in all shapes and forms. The role of fungi in the natural ecosystem, with mushrooms being at the forefront, led him to explore their structures, benefits and cultivation. Bringing his experience in retail and sustainability together, through a lens of permaculture, he cofounded Nuvedo with the aim of bringing legitimate, gourmet, and medicinal mushrooms to Indian people. He is committed towards spreading the nutritive and therapeutic properties of mushrooms while building an ecosystem of trust with the community. His love for people and passion for mushrooms has evoked the birth of this organization.
One thought on “3 Tips for the best oyster mushroom growing experience”
Leave a Reply
You must be logged in to post a comment.


Wow, I’m so buying this next month. Excited! This is a fantastic idea and love the idea of a growers kit. Hope to see more videos and blog entries.