How do I get the most out of my Nuvedo Mushroom Growing Kit?
One of the most common questions we get asked by budding mushroom enthusiasts is- do mushroom grow kits work? Yes they do! They are, in our opinion, the easiest way to grow fresh organic mushrooms from the comforts of your home. Our indoor mushroom growing kit is best suited for use at home and you don’t even need to know anything about mushrooms to use it. All you need is a cool corner in your home, a few minutes of your time everyday for a few weeks and patience.
Nuvedo’s Mushroom Growing Kits are an easy and convenient way to start growing mushrooms. After fruiting for the first time indoors at home, there are several ways to reuse our mushroom growing kit and keep those harvests coming!
In this blog post, we try and answer some common questions about reusing Nuvedo Mushroom Growing Kit. We cover basic questions such as –
- Can you reuse mushroom grow kits ?
- How to reuse mushroom grow kit ?
- What are the different ways in which you can go about reusing mushroom substrate ?
- How to use mushroom grow kit substrate to make mushroom kit ?
Can you reuse mushroom grow kits?
Yes, you can most definitely reuse mushroom grow kits! Mushroom grow kits are generally designed to give you more than one harvest depending on the species of mushroom inside your growing kit. There is enough water nutrition available in the substrate to give you multiple harvests over a period of 2-10 weeks. Our Pink Oyster mushroom grow kits have given up to 7 harvests! It is all about giving them the right conditions to form more mushrooms. Sometimes all your kit needs is some fresh air and water!
How to reuse your mushroom grow kit ?
Let’s explore some ways in which we can get the most out of your mushroom grow kit-
Prepping the kit for a second harvest
After the first harvest, your kit still has nutrition left in the substrate for another flush, however, it is slowly running out of moisture. You can try and get it to fruit indoors again by repeating the process once more, on the other side of your grow kit, as mentioned below:
- Remove the substrate block with the plastic from the cardboard box.
- Make an “X” shaped slit on the unused side of the plastic.
- You can either soak the substrate block for 6 hours in a tub filled with filtered water or continue spraying the new opening with water just like you did for the first flush. (It is worth noting that for your substrate block to remain submerged in the water you will have to keep a heavy object on top of it.)
- Continue spraying the new opening 2-3 times a day like you did for the first flush.
Given the right conditions, your kit should start fruiting again in another week. Get ready for your oyster mushroom second flush!
Shift the kit outdoors
The easiest way to try and get your substrate block to fruit once more is by moving it outdoors. By shifting it outdoors, you’re changing the environmental conditions of temperature and humidity which might signal the fungi to produce more mushrooms.
To begin follow the instructions as mentioned below-
- Remove the substrate block from the cardboard box.
- Don’t remove the plastic and let it stay as is.
- Find a shady area and place the substrate block there in such a way that the cut side faces up and it will receive rainfall.
- Keep checking up on the block periodically, especially after rains or on humid days to see if they have started pinning again
If the block looks dry continue to spray the kit with water as you did when it was indoors. Leaving the plastic on your substrate block helps prevent it from drying out by keeping the moisture in. Outdoor mushroom growing kit use may even help contaminated blocks recover and start fruiting again.
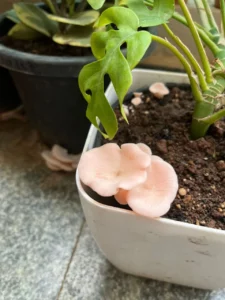
We recommend that you keep your block in the vicinity or under the cover of some potted plants. The added vegetation helps to create a favorable microclimate that is oxygen-rich and humid. Your kit should start fruiting in a couple of weeks if the conditions are favorable.
NOTE: Hypsizygus Ulmarius or Elm Oyster, (high-protein oyster mushroom growing kit) thrives in environments where the temperature is between 20-26 degrees Celsius and has more than 80% relative humidity.
Bury your kit
This is for all of you out there who have some outdoor space and don’t mind getting their hands dirty! To show off mushrooms growing in your garden, follow the steps below-
- Remove the substrate block from the cardboard box.
- Tear the plastic to separate it from the block.
- Find a shady area in your garden and dig a hole big enough to fit your substrate block.
- Gently place your substrate block in the hole.
- Cover up the whole with a 1-inch-thick layer of soil or mulch.
- Water the area daily like you would do for plants in your garden.
- Keep checking up on the block periodically, especially after rains or on humid days to see if they have started pinning again.
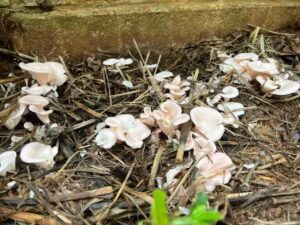
Burying the mushroom grow kit substrate block in soil provides a protective layer to keep it safe from sunlight and the moisture in the nearby soil provides the mycelium with the water it needs. Adding a layer of mulch on top can act as an additional barrier to sunlight.
You could even try burying your used kit in an unused pot with soil in it. This method will be totally worth it when you watch mushrooms sprouting on your lawn or inside the pot in your garden!

Use it to make more kits
If you’re the adventurous type, then you can use the substrate bag the same way you would use spawn and make mushroom kit from it. This process works best with Oyster Mushroom Growing kits that have been hydrated well and fruited recently.
In this method, you are providing the mycelium with additional nutrition as it has already digested most of the nutrients present in the substrate block by now. The hungry mycelium will be more than happy to hop onto the fresh substrate in your mushroom substrate kit.
This method requires a few additional materials to start with:
First, you will need some fresh substrate that the mycelium can feed on. For this, we recommend chopped straw which is around 2-3 inches long.
The mycelium can easily jump from one piece of chopped straw to the other since the particle size is smaller, making it a suitable substrate for mushrooms to thrive on! Other agricultural waste can be used as well but, in our experience, straw gives the best results.
Second, you will need a container that can hold your substrate. For this, we recommend a container with plenty of holes such as a plastic gardening pot or bucket with holes drilled in it.
Once you have these two things ready, you can follow the same procedure used for cultivating oyster mushrooms at home.
Only difference being that instead of spawn you will be using the crumbled-up substrate block.

Make an outdoor cultivation bed using mulch
This method is just like the previous one. We are essentially using the substrate block as spawn to inoculate outdoor beds made from mulch. If you have some perennial trees or an outdoor space you would like to mulch in, this is the best method for you.
We recommend that you use fresh mulch instead of old. This is because old mulch could have other fungi growing on it which will compete with your mycelium. Oyster mushrooms are one of the most vigorous fungi out there so this technique is best suited for them. They are quite resilient and can compete well with other fungi trying to capture the available substrate. To make your outdoor bed, follow the instructions below:
- Spread a thin and even layer of mulch in a shady area
- Add a layer of the crumbled substrate block on top of the previous layer
- Keep alternating layers of mulch and the crumbled substrate block
- Add a final layer of mulch on top as the final layer
- Water the heap generously to hydrate it
- Observe the heap often and make sure that you water it enough so it doesn’t dry out
You need to have a bit of patience with this method as it can take anywhere from 1-3 months before you can see any mushrooms. Factors such as temperature, humidity and total volume of mulch inoculated can play a role in how fast you get your fruits. In our experience, warm and humid weather with a smaller volume of mulch can give you the fastest results if you keep it hydrated!
We hope that this post has given you the information you need to continue your mushroom cultivation journey by reusing your Nuvedo mushroom growing kit. If you have successfully managed to use any of the techniques mentioned above, congratulations! If you’re curious and would like to try cultivating mushrooms from scratch, do check out our walkthrough on Oyster mushroom cultivation.
About the author
 Jashid is the co-founder of Nuvedo. An IIM graduate, with a bachelors in manufacturing engineering from BITS Pilani, his interest with fungi and mushrooms started with looking for alternate sources of vegetarian protein. He loves talking about mushrooms, spending time with them and studying their behavior in all shapes and forms. The role of fungi in the natural ecosystem, with mushrooms being at the forefront, led him to explore their structures, benefits and cultivation. Bringing his experience in retail and sustainability together, through a lens of permaculture, he cofounded Nuvedo with the aim of bringing legitimate, gourmet, and medicinal mushrooms to Indian people. He is committed towards spreading the nutritive and therapeutic properties of mushrooms while building an ecosystem of trust with the community. His love for people and passion for mushrooms has evoked the birth of this organization


